

Introduction
In today’s software delivery, speed without quality is a risk that no organization can afford. While automation, CI/CD, and agile ceremonies are at the forefront of the discussion, there is one core practice that can make all the difference in the success of product quality , defect management. A defects checklist is a control mechanism that ensures consistency, traceability, and accountability in the QA Process.
Without a checklist, defects are incomplete, not documented properly, or worse, ignored. This article will discuss the importance of a defects checklist in the QA Process, its role in the day-to-day activities of the QA team, and how to implement a defects checklist using tools such as Jira and qTest.
What Is a Defects Checklist in QA?
A defects checklist is a standardized validation list that QA engineers follow before raising, updating, or closing a defect. It ensures that every defect adheres to defined quality standards within the QA Process.
Why a Defects Checklist Matters
A defects checklist:
- Improves defect clarity and reproducibility
- Reduces back-and-forth between QA and developers
- Maintains audit-ready documentation
- Ensures accurate test execution history
- Strengthens the overall QA Process
Without such a checklist, defects often lack context, missing evidence, or incorrect status updates, weakening the QA Process and delaying releases.
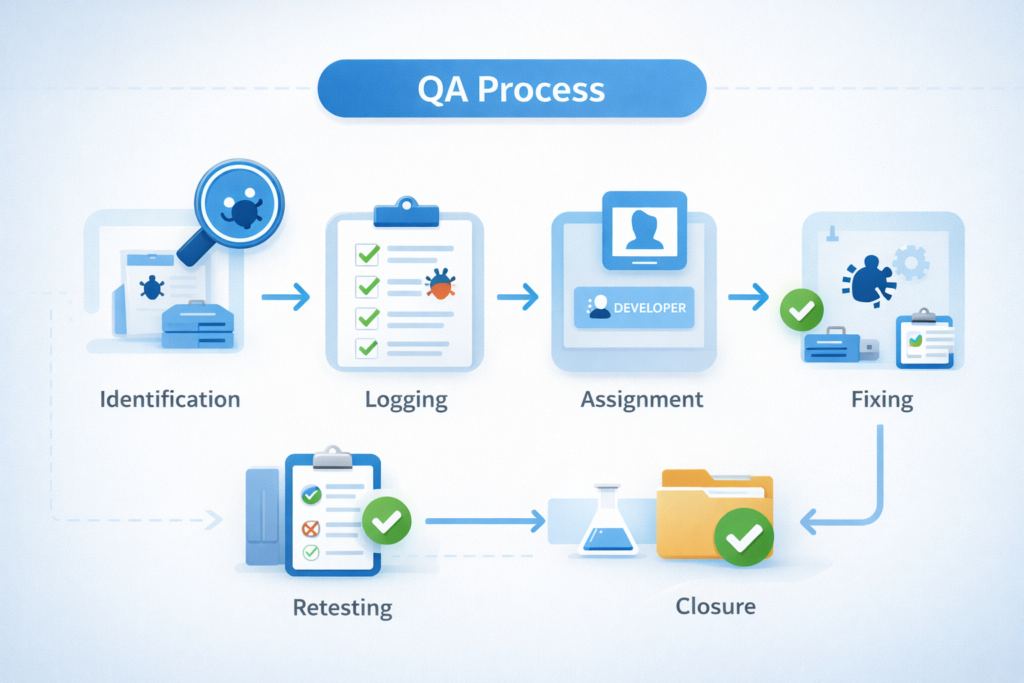
Role of Defects Checklist in the QA Process
The defects checklist operates at multiple stages of the Testing, from defect identification to closure and regression validation.
Key Touchpoints in the QA Process
- Test execution and failure analysis
- Defect creation and triage
- Defect lifecycle tracking
- Regression testing after fixes
- Test case re-execution and history verification
By embedding a checklist into these stages, teams ensure process discipline across the Testing.
Table of Contents
Detailed Defects Checklist for QA Teams
Below is a comprehensive defects checklist aligned with real-world QA workflows.
1. Defect Traceability Validation
Link Defect to Test Case (Step Level)
- Verify that the defect is linked to a specific test case
- Ensure linkage is done at the failed step level, not just the test case level
This step strengthens traceability within the QA Process and helps developers pinpoint failures quickly.
2. Mandatory Defect Metadata Verification
Each defect must include the following core identifiers:
- Story / Business Logic (BL) name
- Portfolio item
- Project name
- Found-in environment (QA, UAT, PROD, etc.)
Missing metadata weakens reporting accuracy across the Testing.
3. Mandatory Defect Fields Checklist
Before submitting a defect, ensure the following fields are filled:
- Defect Status
- Assigned Developer Name
- Verified By (QA name)
- Defect Creation Date
- Defect Close Date
- Broken Story / BL Name
- Defect Category
- Testing Method (if applicable)
These fields maintain lifecycle transparency and governance within the QA Process.
4. Actual vs Expected Data Validation
Every defect must clearly describe:
- Actual Data – what the system is currently doing
- Expected Data – what the system should do
Naming Convention Example
EpicNo_Product_Channel_Environment_Summary
Example:
EP123_Loans_Web_QA_InterestCalculationMismatch
Consistent formatting improves analytics and defect searchability in the QA Process.
5. Evidence and Logs Attachment
- Verify that screenshots, videos, or logs are attached
- Ensure evidence is uploaded in Jira or qTest
- Logs should clearly show timestamps and error details
Evidence validation is a non-negotiable quality gate in a mature QA Process.

6. Defect Status Accuracy
- QA must update status during verification
- Developers must update status during fixing
- Status transitions should reflect actual progress
Incorrect statuses disrupt metrics and reporting within the QA Process.
7. Labeling and Classification Check
- Ensure labels are added correctly
- Use predefined labels (e.g., regression, UI, backend, blocker)
Proper labeling enhances defect filtering and dashboard insights in the QA Process.
8. Steps to Reproduce Verification
- Steps must be clear, numbered, and complete
- Avoid assumptions or vague instructions
- Include test data where required
Clear reproduction steps reduce resolution time and improve collaboration in the QA Process.
9. Defect Visibility in Main Folder
- Verify that all raised defects appear when clicking the main Jira/qTest folder
- No defect should exist outside the defined project hierarchy
This ensures completeness and audit readiness within the QA Process.
10. Re-opened Defect Validation
When a defect is re-opened:
- Confirm correct Release is selected
- Confirm correct Version is updated
- Add comments explaining re-opening reason
This prevents data pollution and maintains accuracy in the QA Process.
11. Post-Closure Test Case Re-Execution
After defect closure:
- Linked test cases must be re-executed
- Test status should reflect latest results
Skipping this step creates false confidence in the QA Process.
12. Test Case History and Logs Verification
- Verify multiple execution logs appear in history
- Ensure logs reflect defect lifecycle (fail → pass)
- Applicable in Jira and qTest
Execution history validation ensures long-term traceability in the QA Process.
Best Practices for Using a Defects Checklist
To maximize effectiveness:
- Embed the checklist into daily QA routines
- Add it to Definition of Done (DoD)
- Train new QA engineers using real defect examples
- Periodically audit defects against the checklist
Consistent usage transforms the checklist into a quality benchmark within the QA Process.
Conclusion
A defects checklist is not just a documentation aid—it is a quality enabler. By enforcing consistency, traceability, and accountability, it strengthens every stage of the QA Process. Teams that adopt a structured defects checklist experience faster resolutions, clearer communication, and higher release confidence.
In an era where quality defines brand trust, a robust defects checklist is no longer optional—it is essential to a successful QA Process.